Friday, January 27, 2012

Panasonic SD-YD250 Automatic Bread Maker

!9#: Panasonic SD-YD250 Automatic Bread Maker

Brand : Panasonic | Rate : | Price :
Post Date : Jan 27, 2012 23:33:12 | N/A

Panasonic SD-YD250 Automatic Bread Bakery with 4 Baking Modes

  • Mixes, kneads, rises, and bakes in 3 loaf sizes, up to 2-1/2 pounds
  • Settings for white, whole wheat, multigrain, French, quick breads/cakes
  • 13-hour delay timer makes meal planning easier
  • Includes recipes for 40 breads and doughs, plus baking tips
  • Measures 14 by 13-1/2 by 9 inches

Shop For 7.1 Home Theatre Systems Bipap Machines Buy Buyers Aed Superstore

Saturday, January 21, 2012

How Long Does a Turkey Breast Take to Cook?

!9#: How Long Does a Turkey Breast Take to Cook?

Turkey is a dish most people ignore until around the time of thanksgiving, but it is actually a tasty, and healthy meat that can be enjoyed at any time of the year. Turkey is ideal for sandwiches, stir frys, salads, and lots of other dishes, and is a good alternative to chicken when you fancy a change, but want to stick with white meats.

The cooking time of a turkey breast depends mostly on its size - bigger portions of meat take longer to cook. Other factors that affect the cooking time include the ratio of meat to bone, and whether or not you are trying to cook from frozen. Another thing to consider is the kind of marinade used, and the cooking method that you plan to use.

What Internal Temperature?

There is no shortage of experienced cooks and top-notch cookbooks that give you their best guesstimate for the ideal turkey breast cooking time. Usually, they will explain that is depends on the size of the piece. However, the best way of getting the roasting done just right is to buy a cooking thermometer and use it to check the turkey regularly to see if the internal temperature has reached 170 degrees Fahrenheit. As soon as the cooking thermometer register 170 degrees, not only is your turkey safe to eat, it is also deliciously moist and tender. There are different methods that you can use to cook turkey, and you have a choice in the pan to use too, but shallow roasting pans are the best bet for cooking turkey breast every time.

Usually turkey breast is served without stuffing, however some people prefer to stuff bigger portions. An 8 pound portion is ideal for stuffing with some of your favorite herbs and spices. Usually for a 2 or 3 pound turkey people cook them for 1 and a half to two hours at 325 degrees Fahrenheit, with 4 to 6 pound breasts taking 2 and a half to three hours, and an 8 pound portion taking 3 and a half hours.

An Easy Recipe

Turkey breasts can easily become a staple of your diet, and you need not get bored of them if you add a little zing to the recipe - a citrus turkey breast sandwich is a great snack for example. Just add some jalapeno paste, lime juice, orange juice, garlic, and onion paste to a marinade - roast the breast, and shred or slice before adding to sandwiches for a healthy and tasty lunch option.


How Long Does a Turkey Breast Take to Cook?

Co Detector First Alert Best Quality Precor Treadmill Discount

Sunday, January 15, 2012

Fresh Fruit and Vegetable Juicer Recipes For Homemade Juices

!9#: Fresh Fruit and Vegetable Juicer Recipes For Homemade Juices

We know that it is a healthy idea to drink fresh fruit and vegetable juices 2-3 times a day. However, these healthy drinks, when bought from restaurants or commercial shops, can be a little expensive. But do not fret because there is always a practical and fun alternative to that.

In the comforts of your own home, you can enjoy the nourishing benefits of a fruit juice or vegetable drink. You simply need to have a juicer, which most household kitchens these days already have. Most of the juicers now are very convenient. You literally just throw all the ingredients inside, turn the juicer on, wait for a few seconds to couple of minutes, and voila! You already have your whole day's worth of fresh juice at half the price of those commercial ones.

In case you don't have a juicer yet, you might want to consider buying one soon. It is a good investment if you care about your health. When you buy a juicer, it should be versatile that it functions not only as a juicer but can also be a chopper, a food mill or a mincer. It is also best to buy one that is capable of working on slow speeds so as not to destroy your fruits and vegetables. Ease of cleaning is another important factor to take note of. The faster that you can clean the juicer, the more varieties you can make in less time.

Some Juicer Recipes

Carrot-Apple-Ginger - Gives you the morning energy boost.

3 Apples
8 Carrots
An inch of ginger root

All Green - Nourishes and energizes the body.

5 Lettuce Leaves
1 Stalk Celery
1 Handful Parsley
2 Handfuls Spinach
2 Apples (for a little sweet taste)

Tropical Cooler - Refreshingly cool. Rich in Vitamin C.

1 Apple
2 Oranges
1 Pineapple
½ Honeydew Melon

Pepper and Fruits - Rich in Vitamin C.

2 Apples
3 Oranges
2 Pears
½ Grapefruit
2 Yellow Peppers

There are lot more fruit and vegetable juice combinations that can be mixed up. These produce can easily be bought from the nearest grocery store. Just stock up in the fridge and always have your juicer ready, and you can have an inexpensive, healthy, fresh juice without having to leave the house.


Fresh Fruit and Vegetable Juicer Recipes For Homemade Juices

Cheap Bob Revolution Stroller Review Bipap Machine Buy Online

Tuesday, January 10, 2012

Panasonic SD-RD250 Automatic Bread Maker with Fruit/Nut Dispenser

!9#:Panasonic SD-RD250 Automatic Bread Maker with Fruit/Nut Dispenser

Brand : Panasonic
Rate :
Price : $154.99
Post Date : Jan 10, 2012 12:24:15
Usually ships in 24 hours


Microprocessor controlled for even baking, special "dispenser" for addition of nuts or fruits, 5 baking modes basic/bake/French/pizza/pasta, 2 loaf sizes (M or Xl), diamond fluorine non-stick coated pan, large lcd readout, 13-hour preset timer, white.

From the Manufacturer

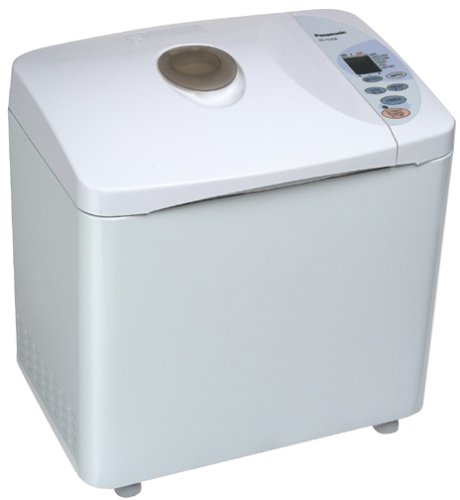
No need to live above a bakery to enjoy the warm aroma of freshly baked bread on a daily basis. Equipped with an array of user-friendly features, this automatic bread machine by Panasonic makes baking fresh, healthy homemade bread--and much more--easier than ever. Now anyone can enjoy the simple pleasure of freshly baked homemade bread--without the time-consuming efforts normally associated with kneading and baking bread. Just add ingredients, press a few buttons, and it takes care of the rest.

Size and color options
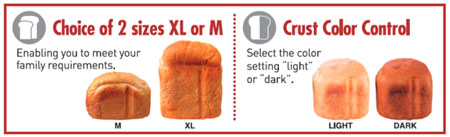
Choose from 2 loaf sizes and light or dark crust colors.
Easily Bake Bread or Create Dough

The bread maker mixes, kneads, rises, and bakes bread in two loaf sizes--medium and extra large, plus offers crust color control with light and dark options to accommodate individual preferences. Its digital control panel with a large easy-to-read LCD display makes it simple to select the loaf size and crust shade, as well as the baking mode. Choose from five different modes: Basic, French, Pasta, Pizza Dough, and Bake Only. The Basic mode works well for a variety of breads, including white and whole wheat; French mode bakes up delicious French bread with a soft interior and crispy exterior--perfect for pasta night. Speaking of, Pasta mode makes several different types of homemade pasta dough--there's nothing quite like homemade pasta. Use the Pizza Dough mode for creating homemade pizza dough in just 45 minutes, or use the Bake Only mode when it's time to bake a cake for a birthday celebration or delectable tea breads to serve with tea when visiting with a friend.

Variety of Baking Modes
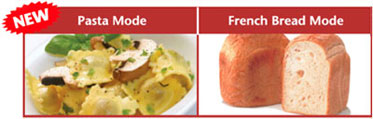
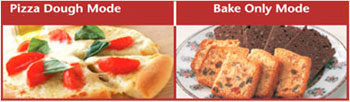
Various modes for baking bread or creating dough.

Even more, the bread maker allows for baking a variety of white or whole-wheat bread for slicing and slathering with butter and jam or for making healthy sandwiches to put in the kids' lunches during the week. Or, make bread dough for shaping by hand and baking in the oven. The versatile machine produces delicious results without the additives and preservatives found in store-bought brands.

Best of all, the bread maker comes with a programmable timer that can be set up to 13 hours in advance, which means it's possible to wake up in the morning to the smell of freshly baked cinnamon-raisin bread. Or set the timer before leaving for work in the morning so that a warm loaf of rosemary bread will be ready and waiting after a long day at the office. Simply slice it up and serve with dinner.

Automatic dispenser
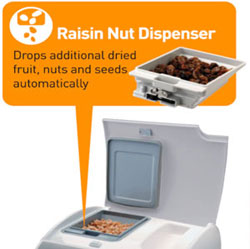
Automatic raisin dispenser removes for easy cleaning.
Unique Raisin & Nuts Dispenser

The bread machine also provides a unique dispenser that automatically drops up to 5.29 ounces (150 grams) of raisins, dried fruits, or nuts into the bread dough at just the right time for thorough, even distribution. When compared to other bread machines, the SD-RD250 turns out loaves with an even scattering of raisins, instead of a clump in one section and bare sections elsewhere. The handy dispenser can also be removed from the machine for convenient washing between uses.

Innovative Design for Professional Results

Unlike other bread machines, the unit does not offer a viewing window. The absence of a viewing window creates a more even reflection of heat inside the unit, which offers the following three advantages: excellent crust, good rising, and even color.

Healthy and Nutritious
Removable pan
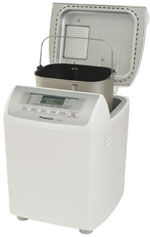
Removable nonstick pan with carrying handle. View larger.

Baking bread at home allows for ultimate control over the finished product. By using only the freshest ingredients and making choices from a variety of options, homemade bread can be an important part of a well-balanced diet--for both young and older family members alike. High in fiber and low in fat, bread contains a wealth of beneficial components. It provides complex carbohydrates needed for energy, protein for strong muscles, and vitamins and minerals, including calcium and iron for healthy bones and teeth. Add nutrient-rich eggs to the recipe or choose whole-grain flour for an extra boost of fiber, iron, vitamins, and minerals. Mixing in nuts and dried fruits not only add to the pleasing consistency and taste of the finished product, but they're also another way to add to the overall health factor.

Durably Built with Diamond-Fluorine-Coated Baking Pan
Removable pan
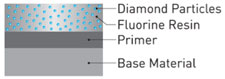
Diamond-fluorine coating on scratch-resistant baking pan for enhanced durability.

The bread maker provides an inner bread pan with a generous loop handle for easy removal (use an oven mitt when hot). The rugged pan also features a diamond-fluorine coating for even heating and scratch-resistant, long-lasting use. In fact, the hard diamond particles, which cover both the surface of the kneading blade and the bread pan, are twice as hard as fluorine resin for unbeatable performance. For added convenience, the pan's nonstick interior ensures effortless food release--dough removes without sticking to the pan and fully cooked cakes and loaves of bread slide out smoothly from the pan and onto a cutting board for slicing and serving. The pan's nonstick coating also makes cleanup a snap.

The small appliance comes in a slim, compact design that takes up minimal space on the kitchen countertop. Keep it out for everyday use or store it on a shelf or in the pantry when finished. Awarded the Good Housekeeping Seal of Approval, the 550-watt automatic bread maker measures 14.6 by 11.1 by 12.8 inches and carries a one-year limited warranty. Accessories include a measuring cup, measuring spoon, and recipe booklet with great tasting ideas for getting started.

Pampers Sizes Order Now Promotions Pentair Vf

Saturday, December 31, 2011

Braising as a Way to Cook Pot Roast

!9#: Braising as a Way to Cook Pot Roast

Pot roasts have two distinct types of muscle components long thin muscle fibers that are visible as grain and connective tissue that is the translucent film that covers the muscle fibers. Both types of muscle components must be broken down during cooking in order for a moist and tender pot roast. Braising is an excellent choice when it comes to cooking pot roast.

Braising encompasses both low heat which breaks down the long thin grain of a pot roast and high heat that is required to break down the connective tissue in a pot roast. Braising by nature is also considered a moist cooking method which is critical to a tender moist pot roast.

To braise a pot roast start by searing the pot roast on high heat in a large skillet on the stove. This will begin the cooking process and begin to break down the muscle fibers in the pot roast. Once the pot roast has been seared on all sides for about five minutes submerge the pot roast in a large pot or slow cooker that has enough water to cover about half of the pot roast. Then place a lid on the pot roast to seal in the steam that arises during cooking. Slow cook the pot roast for 4-5 hours until the pot roast is well done and fork tender.

The liquid remaining after braising the pot roast makes for a wonderful sauce. Simply melt 2-3 tablespoons butter on the stove in a large skillet and add the pot roast liquid. Boil and stir until the pot roast liquid is reduced to about one cup of sauce.


Braising as a Way to Cook Pot Roast

Copper Core All Clad Buy Now Buyers Refrigerators Counter Depth

Thursday, December 8, 2011

West Bend 2 Lb. Breadmaker

!9#:West Bend 2 Lb. Breadmaker

Brand : West Bend
Rate :
Price : $59.88
Post Date : Dec 08, 2011 12:58:07
Usually ships in 24 hours


This non-stick coated 2 lb loaf pan makes clean up easy and can bake a 1 - 1 1/2 - or 2 lb loaf, the electronic settings offer 12 menu selections with different crust selections, the delay start feature allows you to wake up to fresh bread in the morning, or when you come home from work, 600 watts

Snuzzler Head And Body Support For Sale Last Minute Puppets Marionettes Cheap Crown Xti Amps

Thursday, November 17, 2011

How to Make the Best Espresso Shot

!9# How to Make the Best Espresso Shot

[if ]
[endif]

As you are expanding your espresso tasting palate and coffee repertoire, it is incredibly important that you become a connoisseur and a snob so that you can create the perfect brew every time. This is also completely helpful if you are ordering espresso from a local coffee shop or café, which we all have to do from time to time, so that you can judge their product and know if it is up to par. Firstly, I hope that you are using a high quality espresso machine for your home use so that you can focus on creating a premium brew products with advanced technology. The good news for all of you Java lovers out there is that there are many affordable machines, many of them under 00, that have incredibly long life spans and are worth it once you do the math on all of these lattes that you have been purchasing every day. It will also save you money to look for a high quality machine that also includes a grinder, like the La Pavoni Napolitana, which is only 0, and has a built-in grinder and coffee press.

Now let's get down to business on making the perfect shot. You will definitely want to freshly grind your beans to a fine consistency, and then tamper them down into your filter. Make sure that you do not tamp too tightly so that the water can still infuse the espresso properly, otherwise this will result in a weak shot. The ideal brewing time for your shot should be around 10 seconds so that you can make sure that your grounds are properly extracted. If you experience any issues with the brew being too fast or too slow, this may mean that you need to check your grind consistency because it could be to coarse or too fine. After that, you can take a look at your product, and ideally, there should be a brown, rich crema on top to signify quality. The color of the brew should be a dark hazelnut with a deep scent of chocolate and fruit undertones. It is important to drink your brew right away because the aromas and flavors will begin to compromise if you let it sit for a period of time, and the texture and consistency of your shot should be smooth like velvet, with a balance that is not overly bitter.

A few last things to note for the best brew possible is to use filtered water and not tap water because the chlorine content in tap water can affect the taste, not to mention create lime scale in your fine machine. Focus on a thick crema because this is really what reflects the quality of the brewing process, the beans, and the grind. When all of these elements come together, it is like a beautiful espresso symphony that means that you have made the perfect shot! Practice makes perfect, so don't give up, and use this time to keep striving for the best of the best.


How to Make the Best Espresso Shot

Shop Stamina Upright Exercise Bike


Sponsor Links